Tuesday, July 17, 2012

T Shirt designing: Tips

After facing quite a lot of criticism over the previous design, I made sure that I covered all the shortcomings of the previous design and created this one. This is my 4th T Shirt design, so now I roughly know how to approach and what to expect it in its final output. Knowledge of Corel Draw is recommended coz the final design is made in Corel Draw. Even if you don't (like me!), you can create your design in Photoshop/Paint Shop Pro and hand over the design to the printer. Make sure you follow these basic things while designing:

  • Mind your colors: remember that you have only limited color palettes at your disposal. Shades of similar color might not get printed exactly the way you want it to be. So use contrasting and bright colors for your designs. Also the printer would charge you additional cost for every color you use in your prints (irrespective of the print area of that color). So I would suggest you to limit the use of colors in your design to 1 or 2 colors and use them in a contrasting manner to get the best look for your design.
  • Make a big picture: If your design has plenty of graphics, make sure your file dimension is big enough so that you get best resolution while printing. For example: 4000x4000 pixels @ 200dpi would give you a good sharp output without any need for upsampling your image.
  • T shirt color: Always the first thing to consider while designing is the color of the T shirt coz it would act as the background color for your design. Though you can choose a Shirt of any color which is available in the market, but if you're confused over the best color to select, then better go for white, grey or black. They  are the universal colors and by universal I mean they're the best for all practical purposes and suits on all skin tones.
  • Positioning of your design: Make sure you place your main subject/highlight to the 'chest' (thats coz people have this tendency to place the design at the tummy, never do it.)

However these are just some guidelines and the final look you your shirt would depend on your sense of design and etiquette. If you have any queries or suggestions, feel free to express your thoughts here itself or mail me at jishnuclicks@gmail.com


Sunday, July 1, 2012

Photo Market in Delhi...


For those seeking best deals and varieties in  photographic equipment in Delhi, this is the place to look out- Chandni Chowk photo market. I've attached a map locating the best deal shops in their respective category. They've been selected on my own personal experience.Its only after 3 visits and a comprehensive search of the whole market that I chose these shops. Memory cards, card readers, chargers and batteries are found in almost all shops and at same wholesale rate. Almost every item is sold at wholesale rate except tripod, so no point bargaining on those items.
Some shops to specially look out for:
  1. Digital Point: they deal in cameras, lens, polarisers, filters, studio lights, tripods etc. Contact Mr. Kunal Magan @ 9810208094 before a visit. A 10 min chat with this expert shopkeeper can prove really helpful in you selecting the best accessories for ur photographic style.
  2. Standard Album company: A one stop shop for all ur print paper and cartridge needs. They had some cartridges which were available nowhere else in the market. Contact Mr Bhushan Kumar @ 9312606852, 9311106852, 9873063047
  3. Vardhaman Traders: they had a great variety of camera pouches and bags; and i'm sure they have one for ur cam as well. Contact Mr. Vinod Jain @ 9811109449
  4. Khanna & Co.: specialists in photo frames and I just loved the variety and designs of their frames. Contact Mr. Rahul Khanna @ 9350910011
I think that pretty much sums up almost all ur photographic needs,however if you still have any doubts or queries, do feel free to ask them here at my blog or mail me at: jishnuclicks@gmail.com

Wednesday, June 13, 2012

Some panos of my school...

Project KPS: was undertaken on 19th Feb 2012(Kerala School Grand Fete day)
Special thanks to my buddies- Gaurav Kumar for lending me some of his equipments and Sooraj V Nair for assisting me in the project... It took around three months and lot of headache to finish the project

School Inside

Kerala School inside in New Delhi

School Entrance

Kerala School Entrance in New Delhi


School Canteen

Kerala School canteen side in New Delhi


SMS Marg(Road that leads to school)

Srimant Madhavrao Scindia Marg in New Delhi

Wednesday, May 9, 2012

On top of the world

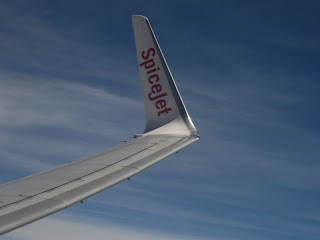
Ok, so it was my first experience on air... and so was the first experience of aerial photography. Taking pics from the sky is an all different feeling and so is the photography technique. Most of the times, you're hovering over the blanket of clouds with blue sky above. Also a thing ti note is the fact that there's a lot of white all around and so is the light reflection. Clicking pics of cloud in auto mode can be a daunting task since the camera wont be able to find much contract in the pic, so manual focus would serve much better. Also make sure that the exposure is kept kept down by a couple of stops. 
Regarding the usage of camera on flight- I went through many discussion forums and websites and found that there is absolutely no harm in using camera on planes. Take as many photos as you wish but make sure you don't disturb the people around you!


In the God's own country...

Visit to homeland is always a special one... more so when its  the 'God's own country'. I can proudly tell you that I belong to Kerala- the place of great culture, wonderful people and lush greenery everywhere you go. Though I am very excited about my photographic works in Kerala , but let me tell you that my brief visit to Kerala was a consequence of my grandma's sustained illness(she passed away the very night we reached her). May her soul rest in peace, n I must admit she was a very lucky person indeed to have spend her last moments with all her children and grandchildren near her. Coming back to the topic, what made the whole journey more worthwhile were my cousins and their lively presence all throughout my journey. Though it was unbearably hot n humid most of the days, which I suppose was the reason for my camera malfunctioning many a times. But as you can see(and I hope you liked a few) I somehow managed to get some good snaps.
My Kerala visit lasted for 2 weeks from 9th of April to 23rd.


colorful bangles

my sweet heart sis

little dude


sunset in palakkad

frozen with time


Jack fruit

Sunday, April 1, 2012

Manali 360 degree

Its gotta be the toughest panorama I've ever created. To create this photographic piece at 5300m altitude above the sea level with the tough cold climate and steep breeze was no small achievement. What made it more difficult was the load I was carrying - my photographic equipments and the tripod. I would've dearly loved to take a panorama on top of that cliff, but the conditions there were so extreme(esp the winds) that I had to fulfill myself with this work only. Special thanks to the new editing tool I learnt - KR pano tools- without which I couldn't have finished the work!


Gulaba-camp, Near Manali in Asia

Saturday, March 24, 2012

Photographing the light- tips

The trick to take a sharp and correctly illuminated photo of a lamp is by adjusting the metering mode to spot metering(by default its set as evaluative or center average). This metering mode helps to get the most out of your little bright areas in the photo and make all the rest as pure black. Secondly- the most fundamental thing while taking photos in dark(which I shouldn't even be reminding u guys)- Keep the camera on a steady base- a tripod or a tabletop. Simple truth is that we just can't take a great shot in dark without camera shake. Keeping these little tips in mind before taking the photo can save lots of time in Photoshop!